Showing posts with label fabric stash. Show all posts

Thursday, June 09, 2016

What was June for Again?

Making garments is the answer and I'll be making several little things for Miss Bu this month. I've just finished washing and drying the fabric for a couple little jumpers and some shirts. Baby girl is growing and needs new clothes.


That's a lot of potential sewing right there (not counting the other two pieces of fabric not pictured because my undies are hanging up just to the right as well) and these are some darn ambitious goals, but I thrive on ambitious goals. Even if I fall a bit short of my intentions, I can still manage something awesome. DaVinci Disorder*, FTW. And, in addition to this, I'm planning on doing a shirt for the Outfit-a-long and, at some point later in the year, I want to do up a Suffragette costume.

This is the pattern I'm using for the Outfit-a-Long and I'm strongly considering the V-neck short sleeve for its versatility, though I really like the slash-front 3/4 sleeved one, too. Nothing saying I can't make both, but for the purposes of the OAL, the V-neck is the way to go. I'm considering a couple different yarns to use for the knitted portion of these adventures, namely Alisha Goes Around: Walk of Snipes in a gorgeous blue that would be awesome as a lightweight cardigan of some kind. I've also got some Quince & Co.: Finch that I really want to try and that would look really great as a cowl. I'm leaning cardigan in the blue, but I think I might have to go pet my yarn and find a pattern I like. I'm going to do Vitamin D eventually, but I think that's going to be an intentional project during the Hyperborean (basically winter) months.

Anyhow, between the end of the school year and the beginning of summer, I've been busy and have been neglecting the ol' blog, but lots of knitting and other crafting is still going on in the background. In addition to the usual stuff, I'm working on an alternate teaching certification program and doing my best to help both kids be as awesome as they can be (which is pretty darned awesome). The former involves regular, concentrated work, the latter, well, gifted kids are a particular challenge. We just got the little one's IQ score back and the psychologist who showed us the number was nearly speechless. It was a really big number.

See? I'm knitting!
All that aside, I'm hoping to get back into the swing of things and to start posting regularly again. I miss blogging and I miss how it was helping me focus on my crafting life. I'm pretty regular on Instagram as DelphinianJess, so if you miss me here, I'll be over there with a fair amount of regularity.

*Not a real disorder

Monday, April 18, 2016

Piecing April: Quarter Square Triangles

So, our dryer broke. We have a clothesline, which is great! And I really enjoy hanging laundry up on the line because I get to be in the sunshine and feel productive at the same time. I like folding and putting away laundry somewhat less than I enjoy hanging it, but it's not a terrible thing. Unfortunately, because Husband is generally the one who takes care of the majority of the laundry duties and those have now fallen to me, that means a serious cut into my blogging and crafting time so that I can make sure everyone has clean shirts.

I did make time for a couple of blocks last week and worked on using the quarter square triangle. Like the HST, you do have to be aware of bias distortion and a walking foot would be very, very useful for avoiding it (alas, I still haven't one). Unlike the HST, the bias is on the right angle and not on the hypotenuse. Confused? Here's a diagram:


I hope that clears up the geometry a bit. This means that the triangles will be right triangles like the HST, but that they will also behave a little differently when you're sewing them.

This week, I did some Ohio Stars:


I'm hoping to do some Isosceles triangles this week, if I don't get buried under the laundry again.

Wish me luck.

Thursday, April 07, 2016

Piecing April: Half Square Triangles

Aaaah, the good ol' HST. It's easy to put together into a variety of patterns either by itself or with other shapes. It's a quilting standby and rightly so, being that the right triangle is fine upstanding citizen of the Pythagorean realm. 

I'm doing a quilt for Miss Bu, since her elder sister's is closer to completion and if I don't get started, I won't finish hers before she goes off to college. 

Sure, it seems like I have a lot of time now, but I thought that about Iris' quilt, too. Best get busy on it. 
She's a shining star.
For Iris, I decided on a rainbow quilt. Iris means rainbow, hence rainbow quilt. For Phoebe, which means "bright and shining," I'm doing stars. There's a lot of potential for using different techniques using star-themed blocks and one of the simplest is the HST.

The simplest HST block is the pinwheel, which to me looks like the rays of a sun. It can also be used as a component in other blocks, so I thought I'd get a little practice in on this.

Before I show you the other ones, I feel it's necessary to pause for a public service announcement:

Bias distortion is real. If you or a friend has experienced bias distortion, don't despair. There is a solution. 

When you are cutting HSTs, the sides that form the right angle are often on the grain and the cross-grain. That is to say that those cuts run more or less parallel to the vertical and horizontal threads that compose the fabric. Therefore, the long side will be on the bias. The bias is stretchy and goes all wonky (that's a technical term) when you stitch it, meaning that your squares will go off-square.

What I want to have to solve this problem is a walking foot. I do not have a walking foot. I do, however, have junk mail. A bit of paper under the seam keeps the feed dogs from stretching the fabric out and tears away easily. It's not an ideal solution, but it's better than nothing. Tear-away stabilizer would work fine too, I imagine, but I didn't have any of that, either.

This is the friendship star, which is just a 9-patch using HSTs and plain ol' squares. It has a satisfying star shape and is easy to assemble. The whole square is mean to be 9", finished, so 9 1/2" unfinished. Each of the smaller squares, then, is 3" finished and 3 1/2" unfinished. For the HSTs, make a square that's the desired finished width plus 7/8, and cut it corner to corner to make a triangle the correct size.

You can fancy it up with fabric choice and by changing up what you're doing with the smaller squares. 
I'm fond of the wee little mini-9-patches. This brown one was a practice piece and will become something that is yet to be determined. They might be large potholders or a table runner or something else. The fabrics were a recent gift from a friend (Thanks, Robbie!) and I'm super tickled to start using them with some of my old stash. 

The last one (below) is my favorite of the whole batch and I'm infinitely pleased with how it turned out. 


There are more HST blocks to be had, but for next week, I'm going to do some more difficult geometry. There might even be trapezoids; you don't know what could happen!

Tuesday, February 02, 2016

FO: Plaid Pajama Pants


I've had this pair of pants in my pile for quite a long time. Up until now, they've been mostly, but not quite wearable.

I finished the seams with a zigzag stitch over the edge, fixed a blown seam up one leg, sewed up some slashes I'd made at the side, and installed some elastic to replace the drawstrings.


The observant among you will notice there's a drawstring in them.

The fabric I used is a little heavy and, unfortunately, because of the way I put the elastic in, it doesn't spring back as much as I'd like it to. The drawstring solves that problem and the elastic plus drawstring is much better than just the drawstrings.

I now have twice as many pajama pants and one less project in the pile. I call this one a win.

Thursday, January 21, 2016

Month of Mending: Sashiko patches

Blackwork is really great for reinforcing fabric, but not so great for repairing holes. One of my favorite ways of doing that is with sashiko, a Japanese mending technique that's alternately referred to as embroidery and quilting. Unlike blackwork, sashiko was an art of impoverished people, developed from necessity. A poor farmer or fisherman's wife would recycle old clothes that had been worn to rags by cutting patches from the least worn parts and stitching them to worn parts of newer clothes. This was slow fashion before slow fashion was cool. In the Edo Period, sashiko was used to make protective coats for firemen and on Sado Island during WWII, some pretty hardcore ladies made sashiko coats to protect them as they carried logs down mountains on their backs1.

Sashiko means "little stabs" and is usually done with light thread on dark fabric, generally indigo dyed cotton-- you know, like your jeans.

It really looks complicated, but it's only running stitch. There are a few rules about turning corners2, but the mechanics of sashiko are really not at all difficult.

For these patches, I've used a fabric with a square pattern woven in so that I could "cheat" and make my lines and stitches even and on patterns that I've seen, each stitch is charted out for you. Honestly, I don't have time for all that and, I'd wager, neither did the mothers and wives in Japan. Neater stitches are, of course, more desirable, but that comes with practice.

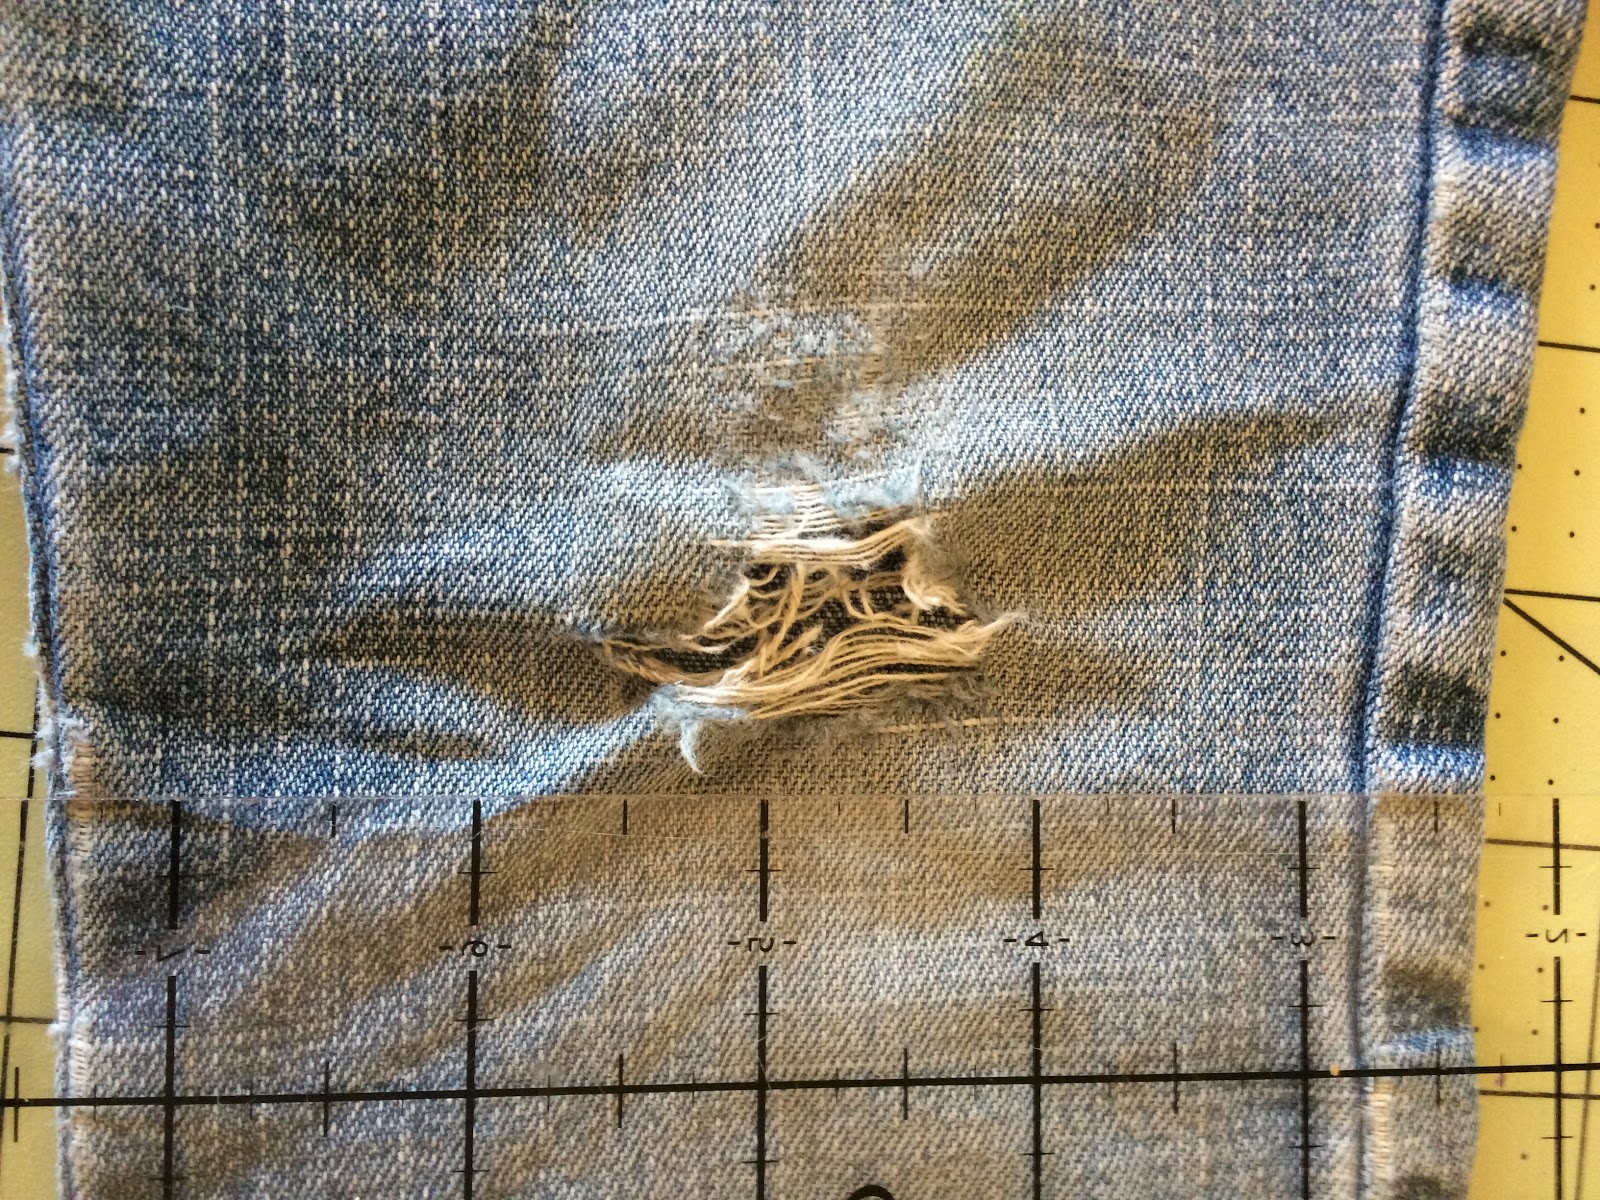
Here's a pair of little Bu jeans that was torn after a fall on concrete. She had a scraped knee and some tears, but was otherwise fine. Her jeans were not so fine. The hole is about two inches wide and about an inch tall. The fabric on the other knee was week, so I decided to do matching knee patches.


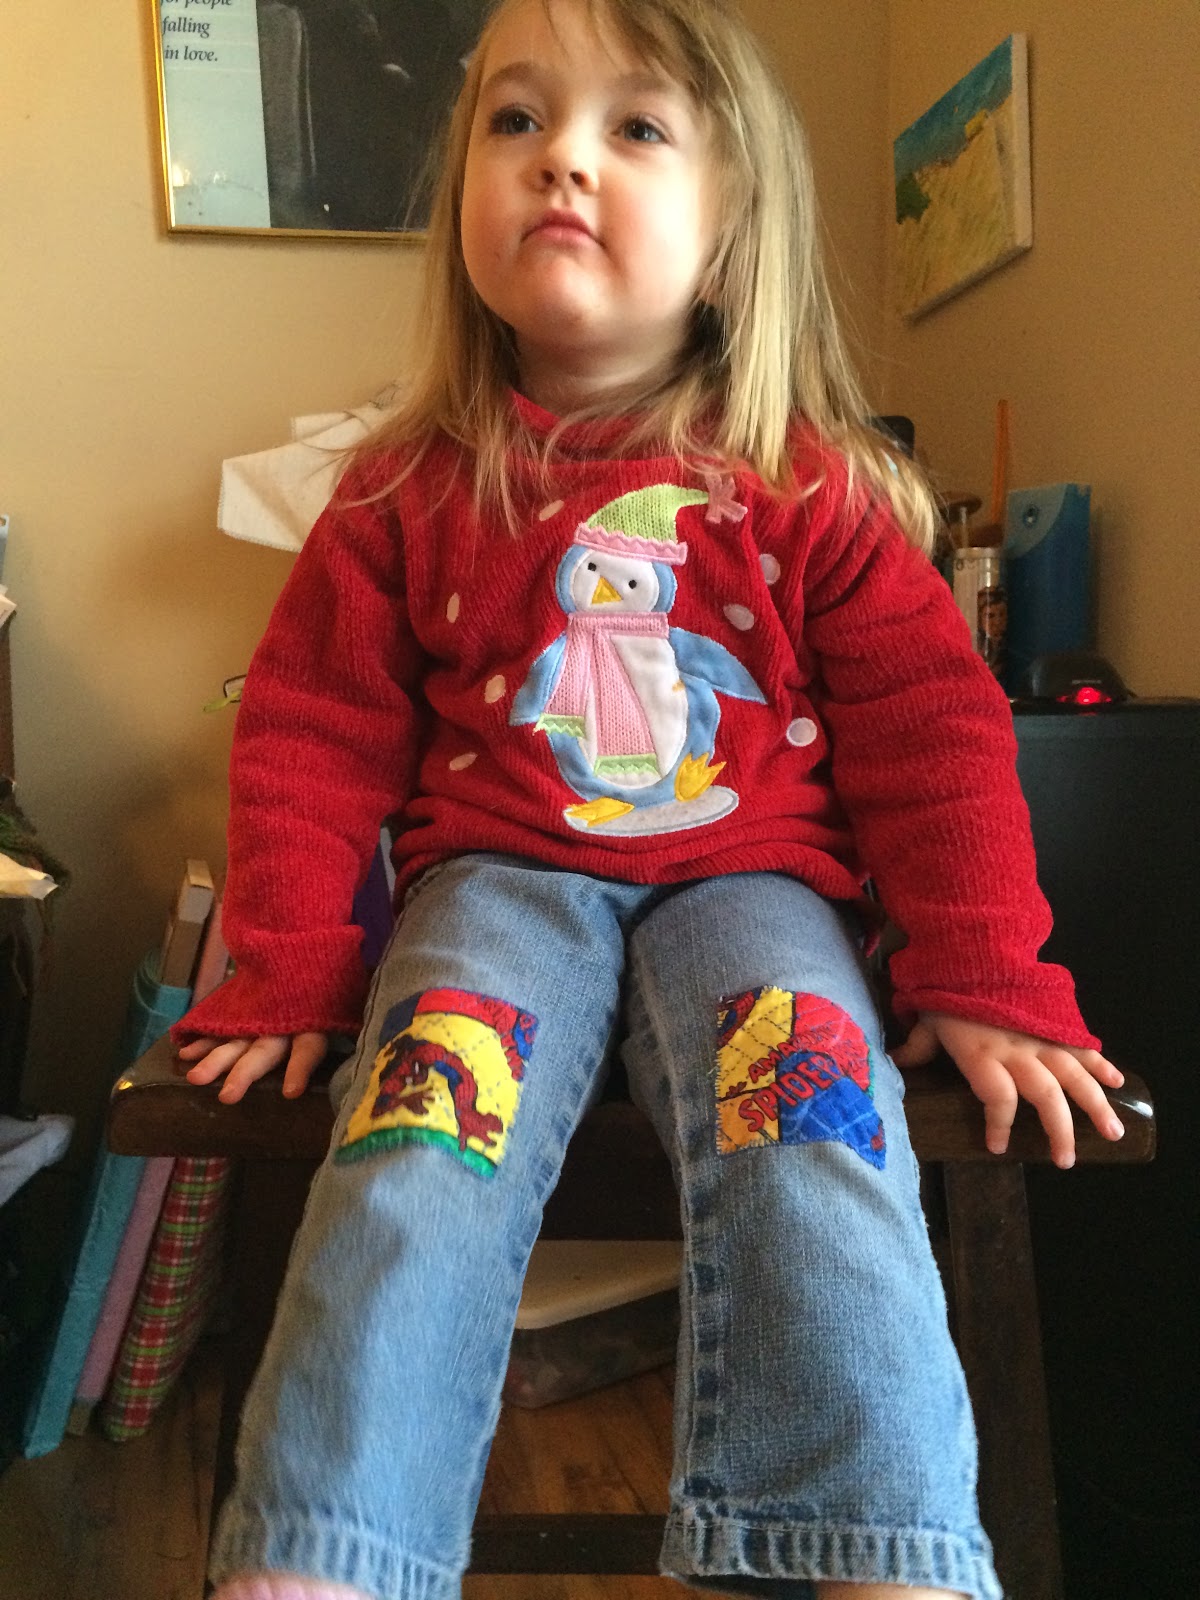
She picked Spider-Man fabric for the patches, so I fussy-cut a couple of patches and found patterns that I thought would work well: Amime (net) and Higaki (cypress fence)3.

Designs were transferred to the patches, then pinned over the holes.

The knee with the hole got a smaller design and the knee with only weak fabric got the larger design, the rule of thumb being that more stitches means more reinforcement. I did my best to follow the rules for tidy corners and since the wrong side wouldn't be seen, I didn't worry about carrying the thread across the back. I worked from the middle to the edge as best as I could.

Instead of turning the edges under as I did with the jeans above, I decided to blanket stitch around the raw edge to keep it from raveling. I don't know how it's usually done, so this is experimental.


I used some bright blue DMC stranded cotton out of my stash and a regular embroidery needle. Sashiko needles are a thing, as is sashiko thread, but in the interest of economy (with a nod to those thrifty Japanese ladies), I used what I had.

The result seems sturdy so far, but we'll see how it holds up after some small person action and a wash or two. If my jeans are any indication, I think they'll be fine.


The best part of this repair was when Bu gasped and said, "You fixed them! Thanks, mom!" The whole operation was the work of two days (not constantly) and a happy girl made every minute worthwhile.

Next week will be darning and I've discovered some super fancy techniques that I haven't tried yet.

1. A little history on sashiko here
2. How to turn neat corners
3. A short tutorial and some patterns

Wednesday, December 30, 2015

FO: Winter Jammies


A couple FO's that were actually finished last week before we left for Chicago.

Both are Simplicity 8488, D, in size 3 with no alterations to size or fit.

I did do a couple things to make them special, though. The Snow Jammies have a bit of ribbon at the front and hand-tatted snowflakes made by my very own sister specifically for these jammies. She did the hard work, I just sewed them on. You can kind of see them in the picture below and I love that they're subtle, but add dimension and puffy heart love from Aunt Erin.


Fairy Jammies have an added sparkly tulle netting over top of the top part of the bodice and a line of beads hand-sewn across the chest.

Both are comfy, easy to put on and take off, and should be sturdy enough to pass on to other certain little girls that may grow into them after Miss Bu has grown out of them. Both were made completely from stash, excepting the bias tape around the neckline.

Slow fashion is harder for little ones who are growing like weeds, but I can at least make something that can be passed on and used and loved by more than one kid. I'm most likely not going to be making all of her clothes and I have bought her a stack of much-needed new things, but a couple pair of Mama-made winter jammies is a nice addition to a little bitty's wardrobe.

Thursday, December 10, 2015

Dance of the Moose Pants Fairy


Happy holiday season! Whatever you celebrate, if anything, I hope you have  a good one. It's getting festive here at the House of M.


It's also recital week this week and, for the first time, both girls are dancing. It's kinda neat that Bu's first recital is Nutcracker because it's a special thing at the dance school. Bu's part is pretty small because the littles have short attention spans and are pretty much there to be cute and experience being on stage, but she's super excited and will just randomly start doing parts of her dance.

Bu and some of the Nutcracker Corps dancers
 The littles wear Christmas-y pajamas for their costume, which is easy, inexpensive, and comfortable. I had some wintery fabrics on hand, so I thought I'd do up some pajamas for her instead of buying some. I had just enough of this fabric for some jammie pants and the shirt is one she already had. I'm missing some bias tape to finish the other two sets of jammies in the works, but these are delightful and perfect for her first dance on stage. I give you the first FO of this week: Moose Pants!

The moose are my favorite
The second FO this week is a pair of socks for Miss Iris. These are called Pronaia, which means "forethought." This is the Fork in the Road pattern by Lara Neel in  Sock it to Me Fair Isle in the Covered Bridge for the main part and Knit Picks Stroll Solid in Fedora for the heels, toes, and cuff.


I'm also doing a fair amount of stash fluffing, which includes washing and measuring some of the handspun, generally taking stock of what there is, and making sure everything is entered properly with pictures into the Ravelry stash. For a taxonomist, this is a walk in the park compared to obscure Andean butterflies, but I'm using many of the same skills. Sort by shared characteristics (in this case, color), label everything, take more notes than you think you need to. That is how you science.


 Finally, as part of the upcoming Project Make reboot: A year long along of alongs, I'm announcing the first few months' alongs.

January is for Mending: Visible mending is more than just fixing your clothes. You're applying functional art to garments that would otherwise be tossed in the trash bin or headed to the thrift store. Mending is fun, decorative, and good for the environment.


February is for Finishing: I'm certainly not the first to suggest this, but as a person with  DaVinci Disorder*, I always have unfinished projects to attend to and this is a good chance to take stock and give some attention to what might otherwise be abandoned to the depths of the WIP pile.

Weaving in ends
March is for Embroidery: Embroidery is one of my favorite crafts because it's like painting with thread. It's also one of the oldest crafts known to humankind and hasn't changed much since the dawn of time. If you're into socks, mittens, or other things that come in pairs, March will also be for Making Mates, but I'm going to be focusing on embroidery for the purposes of Project Make.


That's it for now! I'm looking forward to the beginning of the year. 

Thursday, August 13, 2015

Another DaVinci Disorder* flare.


I'm happy to report a finished object this week. That's 356 yards (326m) of Cascade 220 in a lovely coral with the compelling color name 7830. This is a variation on the BFF cowl by Ysolda Teague and tiny owl knits. I did the first link as written, but the second link is one of my own devising. There's a tight cable braid up the middle, flanked by... I forget what the stitch is called. It's a 1x1 rib that shifts over one stitch every two rows.  The border is the same as in the first link, three stitches of ribbing: purl, knit, purl on the right side, followed by three stitches of stockinette that curls over for a nice rounded edge. It's already been delivered to the BFF in question and I'm just waiting on my link to really finish the whole shebang. That would be a not-so-subtle hint if said BFF hadn't been working on a sweater for her darling and delightful youngest child, but now that it's finished (it's really awesome work, BTW)...

Where my link at, woman?

I will wait patiently. No rush. When you get to it, you know.


I also finished a stack of small project bags. They're about sock-sized, I think, and I'm rather pleased with them. All they need is a little bit of ribbon to close them up and they'll be completely finished.

I love that the plaids are matched on the side, but my favorite part is the liner and the shirt pocket inside.

I'm not sure why that tickles me so, but it does.

These were made for Project Make as a companion piece to the plaid shirt that I made for the Outfit-a-long, where I learned to match plaids and when not to bother (such as with the shirt pockets).


I also finished plying some merino? from a sheep named Sophia that was dyed for me many moons ago. It's about 145 yards of two ply about fingering weight or so, Z-spun and S-plied, as is my custom.  So that's three FOs from three different crafts this week. Golly. Unless some miracle occurs in the next day, I've got a little over a thousand meters to go in Stash Dash to reach 3k. I'm not going to "win," but I'm pleased with the finishing I've done anyway.

It's been a busy week of crafting. I even started to cut my t-shirt, but then realized I wanted to do some alterations and needed a little help.

I've started and nearly finished a ballband dishrag out of Mason Dixon Knitting. This one is the inverse of the one I did before, which has now faded so that the colors are about indistinguishable.

One end of the Leto is about done and it's been getting some love as my travel project. These two have been my most active projects and were the ones I took to the Yarnspinner's Bee at our local library. I regret not getting a picture because these ladies were pretty great. Other than the announcement on the library's website, there's no actual presence on the web. They're not on Ravelry at all, which is a darn shame, because I think they'd get a kick out of all the free patterns available there. Ms. Nancy made some adorable pirate-themed stuffies from fleece, Ms. Vera does some amazing beadwork, Ms. Lorna who directs Children's Literature there is content to make simple scarves, and Ms. Cara is the quiet one. They all had about forty years on me, but I don't think I've laughed so hard in a month. I'll be going again, for sure.

And here you go, Mom. Phoebe hugging my elbow:


*DaVinci Disorder is not a real disease. My sister and I made it up to describe our crafting polygamy. 

Thursday, July 30, 2015

En Pointe

I made those feet. She made them be awesome.
Iris gets her pointe shoes this Saturday. This is a big deal for a dancer, like getting your wand before you go to your first year at Hogwarts. The shoes and the dancer's feet have  to be just exactly right for each other or disaster follows. She could be injured or worse-- expelled!*  At any rate, I'm proud of how hard she's worked to get to the place where she has the opportunity to work even harder. Here are some Australian dancers explaining this a little better than I can:


The best way I know how to express my joy for her is with knitwear, so a pair of rainbow socks seemed like just the thing. The socks pictured above are called Beautiful Feet and it's Lara Neel's Fork in the Road socks, toe up version of my own devising, in Knit Picks Felici: Rainbow and Studio Avenue Six Self Striping sock yarn: 2 light blue, 2 dark blue (discontinued).

I made some headway on the second link to the BFF cowl as well and I seem to be hitting my stride. The first part of the cabling is a little wonky and I'm going to leave it because I'm a little wonky and my BFF knows it.


Leto, on the other hand is stuck in the black hole of being made out of lace weight and longer than is strictly necessary, but I love the drape of a finely knit fabric and, frankly, kind of want to have a big wide chunk of that border pattern. It's a process knit, anyway, and not a product knit. Its lesson is patience and persistence.


 The black alpaca got a little bit of attention this week, too, and finally got carded and spun a little. Tour de Fleece wasn't going to happen this year, but I'm glad to move the fiber queue up a little.

In ballet, to be en pointe is representative of skill, persistence, dedication, and strength. Taking point in the military means to be up front (where the danger is). Being on point in other contexts could mean to be at the forefront of an issue or to be someone who exhibits competence and style.

Sometimes I feel like I'm running to stand still, but I've had a good week. I feel on point/en pointe myself, and you can take any of those meanings you like except for the one where I'm literally standing on my toes.


Because that's really Iris' thing.


I only do it to reach things on tall shelves.


Which, frankly, is kind of often.

This is this year's Colors of Fall Outfit-a-long all finished. One plaid casual men's shirt from stash flannel and one Trillian by Martina Behm in Silky B Cashmere in a navy sparkle, bringing my Stash Dash total meterage up to 1,462, about halfway to the 3k line. I deviated from the official OAL patterns, but I'm going to get a lot of wear out of both of these, so that's a definite win. I feel competent, in front of things, skillful, and maybe even a little stylish.

Iris is definitely all of those things and more. I'm proud of her. Good job, kiddo.**

*no one is getting expelled. Chill, Hermione.
** I also realize that the only picture of Iris in this post is the one of her feet. She's elusive and difficult to photograph, like Bigfoot, but more graceful and with better eyeshadow. She's certainly less hairy. I'm also very proud of Bu, who is full of so much potential energy and deserves much more than a footnote.